
At home arcade build - RetroPie in DIY cabinet kit
RetroPie arcade cabinet
tldr - I built a raspberry pi arcade cabinet and shared a few details here if you would like to do it yourself. Scroll down to the bottom for the materials.
I'm far from a gamer, however I do have some nostalgic gaming memories. Sitting on the floor in front of my parents zenith console tv playing super mario brothers, occasionally dropping quarters into the street fighter arcade in the movie theater lobby, later in life it was golden tee in a dimly lit dark corner of a bar while hanging out with friends, and today it's watching my kids play fortnite.
While working on our basement remodel I came across RetroPie, which combines my love for technology (Raspberry Pi), the idea of an at home arcade, and just a cool piece to finish off the basement that is currently on pace to never be finished because I keep finding more projects to work on like writing about my projects :)
At home arcade
This is not the first time I started building an arcade for our house. Many years ago I came across MAME emulators and started acquiring a large CRT monitor, a dedicated PC, and was in the process of building a huge arcade sized Mame cabinet. The limited tools in my workshop at the time and my lack of focus on the project eventually turned the cabinet into a nice campfire in our backyard. It's time to learn from my past mistakes.
There are several RaspberryPi devices around my house that have lived different lives. One of them was turned into a router that didn't pan out the way I expected and the Pi was sitting around collecting dust. It was the perfect opportunity to revisit the idea of building an at home arcade at the fraction of the price and fraction of the size of the previous full blown MAME arcade and use this Pi to do it.
Arcade cabinets are typically the size of refrigerators and I didn't want to consume that amount of space in our basement. The specs I had in mind was something that could mount on the wall, a minimalist design, and something unique that didn't just look like some generic thing sticking out of the wall.
While hunting for cool arcade builds, cool home arcades, raspberry pi arcade kits, minimalist retropie and bingo... This reddit post came up and knew I found a start of where I wanted to take this project. At this point I had everything in my head and just needed to start buying and putting the pieces together.
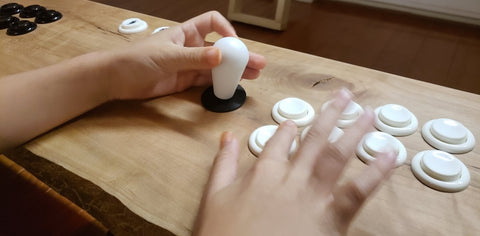
Ordering the Raspberry Pi Arcade Buttons
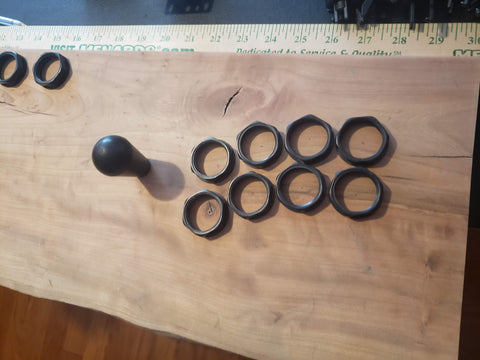
This is a pretty simple step. I found the following Arcade controllers and buttons on Amazon. I ordered the Black and White buttons and joysticks along with the necessary controllers, wiring, etc to connect to the Pi. It wasn't clear at the time if this was the correct thing to order, if I had enough buttons, if I needed something else, if it would work with the raspberry pi 3 or 4. Knowing what I know now it was exactly what I needed, I was just overthinking as I occasionally do.
If you order the arcade controllers above, do yourself a favor and order a drill bit 1-1/8" The instructions were not very clear, the size of the buttons were in mm and in the U.S. finding the right sized bit in metric mm wasn't easy. The 1-1/8" was the perfect sized drill bit to make holes for the arcade buttons and the joysticks.
Arcade Button Layout
During this process I learned more about Button layout, finger positioning, Japan vs U.S. Arcade layouts, and really more information that I care to understand. Go read for yourself and find something that works for you.
http://slagcoin.com/joystick/layout.html
After too much reading I picked a joystick and button layout and printed it. Then adjusted the printing scale to fit my fingers and the wood arcade panel. I started at 100% scale and went down to 50% scale and then everywhere in between. Finally I landed on 57% scaled down printing my using the templates from the link above. It was the perfect distance between the buttons and my fingers aligned well on the paper. The % might differ based on printer and paper size, so print your own until you find the right size for your setup.
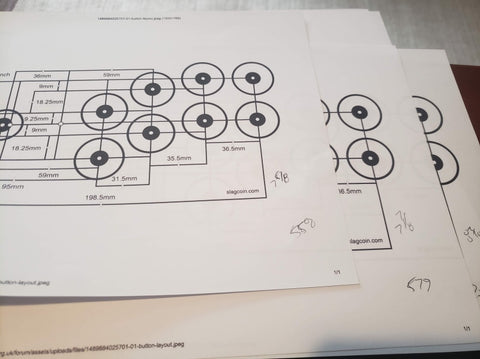
Once you find the right size print out two of them so you can use it as a template later for drilling holes (one for player 1 and the other for player 2 assuming you have a two player setup). I wrote down the % at the bottom and took a picture from my phone of it just in case I needed to print another one later.
Laying out the cabinet
The idea for the arcade cabinet was just a piece of wood big enough to fit all of the arcade buttons, a small box underneath that would hold all of the electronics, and the ability to have black pipe come out of the wall and mount to the bottom.
The top dimensions are 30" wide x 9" deep
The bottom box is 28.5" wide x 7" deep and 2.5 inches tall
Several years ago I learned about live edge wood and bought enough to build a complete bar top, several shelves around the house, and have left over boards just waiting for a new life.
It needed to be wide enough to allow for two players to comfortably play side by side. The depth would be enough to allow for all of the buttons to be placed and enough room for the palm of your hand to rest on the wood.
I cut the wood with a table saw to make the rear edge straight, and cut the width. This live edge piece of wood had plenty of saw marks in it from the mill, so I also had to burn through a ridiculous amount of sandpaper to smooth it out.
The wood is curly cherry and extremely hard. A belt sander with 40 grit took out most of the rough spots and I kept increasing the grit and eventually went to an orbital sander at 120 grit. There was a good 1 - 2 hours of sanding on this piece. If you are going to use a hard piece of wood be prepared to spend quality time with it.

Unfortunately my arcade buttons and drill bit had arrived by the time I was done and I was too excited to get them mounted on the wood. At this stage I should be finishing the wood with boiled linseed oil. Instead I was drilling holes and mounting buttons and joysticks. I'll regret this later.
Wiring the RetroPie Arcade buttons
Once you mount the arcade buttons and joystick the task of wiring everything begins. The instructions are clear as mud, so let me make it easy for you. Looking at the wires it's pretty clear what connects to what, but in what order and to what pin on the controller. IT DOES NOT MATTER. JUST KEEP IT CONSISTENT.
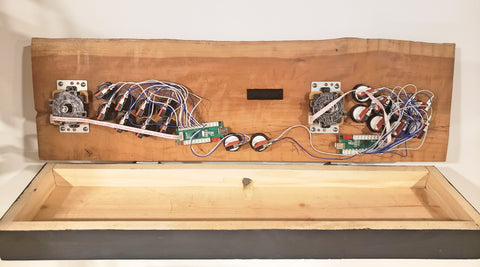
I learned the hard was that when I wired player one and player two buttons to the controller differently it created problems with the mapping later on and I had to disconnect all of the wires and rewire them the same way. Whatever you choose to do with player one controls just do the exact same thing with player 2. Including the direction you mount your joystick.
Setting up the RetroPi
A RaspberryPi 3 with a 64gb micro sd card running Raspbian is what i had and thought I should just install RetroPie on top and that turned out to be many hours of frustration with an older version of Raspbian that wasn't compatible with RetroPie. Long story short, go get a pre-made image of RetroPie and use it. The only exception is if you don't want to wipe out something already on your Pi, but be ready to be technical and dig into problems if you go that route.
RetroPi ROMS
Where to get them is a bit of a dark hole you'll need to travel down. There are plenty of ROM packs that are available for free and the creators enjoy sharing and appreciate you playing their games. Most ROMS that people look for are not the ones that the creators want you to download such as PacMan. They are the games created by gaming companies that want you to buy the gaming consoles. I'll let you guess what they think about you downloading ROMS of their best games.
Having said that go to google on your computer and look for the console of choice and the game you want. It won't take long for you to find what you are looking for.
Once you do you'll need to download the ROM image (it's usually a single file) and you'll need to get that file onto your RetroPie. If you are a technical person the easiest way is to sftp it to the RaspberryPi. If not, you'll want to load it onto the sd or microsd card on the pi or use a jump drive.
Monitor for RetroPi
I set everything up and used a TV in my living room to test it all out. Eventually I would need to find a dedicated TV for the arcade. There are a few problems when it comes to selecting the monitor to use. These old games are displayed in 4:3 format (think old box TVs) and almost every modern TV is in 16:9 format (widescreen).
That means when playing most games the full TV width will not be used. It's a bit annoying, but a small price to pay to have a nice looking TV with your at home arcade.
There are several options I considered including a flat screen TV, a computer monitor, or an all in one computer. I really liked the idea of an all in one computer because it could double for a computer when people are not playing video games. The downside is I didn't really have a good place to keep the keyboard and mouse and also couldn't justify the extra cost. If I were to do this over again I might create a way to have a keyboard slide out from underneath or maybe something that goes over the top to make it flat. I digress...
Eventually I selected a 32" slim profile TV that would fit the minimalistic look I'm going for. I also bought a swinging arm mount which would allow me to center the TV over the arcade buttons.
Materials
Raspberry Pi 4 with micro sd card, power supply, etc - I used a Raspberry Pi 3, however if I was starting from scratch I would use the 4. Mine chokes on N64 games and I understand the Pi 4 will handle them better.
Live edge cherry board - Local Mill
1"x3" 6 ft long (you'll need to cut it to size) - White pine for the bottom box surround
1"x6" 6 ft long (you only need 28.5 inches of this) - White pine for the bottom of the box
small hinge for the top board to mount to the bottom box
Wall mount for arcade - Black pipe, elbows, mounts found in lowes plumbing section. It created a very nice arcade controller stand mounted on the wall.
Black paint for bottom box. I used Sherwin Williams Inkwell. This was leftover from another project. You can use any black paint.

We really enjoyed creating this project and hope you enjoyed seeing what we did.
2 comments
@Max – Thank you very much for the comments. We ran the electrical outlet in the wall behind the TV in order to hide the plugin. There is an HDMI table and USB power that routes from the rear of the box up to the TV as you can see in the picture.
What a beauty. How did you handle the electrical? Route cabled in wall? That slab you used is very clean!